Wailing Caverns
| Wailing Caverns | |||||||||
|---|---|---|---|---|---|---|---|---|---|
| WC | |||||||||
 Wailing Caverns loading graphic | |||||||||
| Location | Lushwater Oasis, Northern Barrens | ||||||||
| Race(s) |
| ||||||||
| End boss |
| ||||||||
| Instance info | |||||||||
| Type | Dungeon | ||||||||
| Level | 8-30 | ||||||||
| Classic Level | 17-24 | ||||||||
| Player limit | 5 | ||||||||
| |||||||||
The Wailing Caverns is in the Northern Barrens, to the south of Crossroads, on the north side of the Lushwater Oasis.
History


The Wailing Caverns are a network of underground caverns within the heart of the Barrens. Its waterways carry underground rivers for miles beneath the savannah, and naturally bubbles to the surface as small oases throughout the Barrens. The caverns were discovered by the night elf druid Naralex, who named them after the mournful howls produced by the wind traveling through the caverns and the steam venting through small cracks in the rock. Naralex believed that if he connected the underground waters directly to the Emerald Dream, he could spread growth across the Barrens and restore the region to its original lush state. He traveled into the caverns with his loyal disciples and settled into meditation, allowing the Dream to connect to Azeroth through his body. However, he was unexpectedly overwhelmed by the Emerald Nightmare. Unable to wake, the sleeping Naralex inadvertently channeled the Nightmare's energies into the caverns, corrupting the waters, the wildlife (which turned into deviate forms), and his disciples, most of whom went insane and became the Druids of the Fang.[1][2][3]
Adventure Guide
Years ago, the famed druid Naralex and his followers descended into the shadowy Wailing Caverns, named for the mournful cry one hears when steam bursts from the cave system's fissures. Naralex planned to use the underground springs to restore lushness to the arid Barrens. But upon entering the Emerald Dream, he saw his vision of regrowth turn into a waking nightmare, one that has plagued the caverns ever since.
World of Warcraft

After the group of druids became trapped and corrupted in the Wailing Caverns, the Horde launched a rescue mission, cleansing the caves of the Emerald Nightmare and saving several of the druids.[4]
Legion
![]()
- Main article: Wailing Critters
Corruption continued to flourish in the Wailing Caverns since Naralex's awakening.[5] Some deviate critters had survived, and they were now growing and multiplying in numbers.[6] An adventurer went there to cleanse the caverns.
Battle for Azeroth and aftermath
![]()
Azerite, the blood of Azeroth, flowed through the Wailing Caverns in tremendous quantities and was fought over by the Horde and Alliance.[7] Due to the Azerite, the animals of the Overgrowth were acting strangely.[8][9]
As powerful magic seeped through the Wailing Caverns that was transforming the Barrens, Alliance and Horde champions were sent into the Caverns in order to devise a way to leverage that magic. Musu Gentlemoon and Hannah Bridgewater were known participants.[10]
![]()
According to Zekhan after the Fourth War, the corruption of the Nightmare has remained in the Wailing Caverns since Naralex's rescue, and even the Horde and Alliance abandoned interests in the area's natural resources.[11]
Geography
Maps

Subregions
Quests guide
Dungeon denizens
Bosses
The following bosses are present in the Wailing Caverns:


 Lady Anacondra
-
 Kresh
Kresh -
 Lord Pythas
 - Lord Cobrahn
-
 Skum
Skum -
 Deviate Faerie Dragon (rare)
 - Lord Serpentis
-
 Verdan the Everliving
 -
 Mutanus the Devourer
Encounters
| Bosses | Monsters | NPCs |
|---|---|---|
|
||
|
||
Walkthrough

The part of the dungeon before entering the actual instance is filled with 14-17 raptors, wind serpents, and oozes. This part is easy, just follow the path till you get to the instance. The one pool on the path that you cannot walk around is a minor trap with two threshadons. If you are doing ![]() [18D] Trouble at the Docks, the NPC you are looking for, Mad Magglish, can be found in three different locations. He can be hard to find as he is invisible (when you get close to him he appears and attacks you). Upon entering the cavern you will come to the first intersection (T shaped) where you can go left toward the instance entrance or straight to a small drop off. The small nook to the right is the first location where Mad Magglish may be found. If you can't find him there, proceed down the left passage toward the instance entrance. You will come upon a second intersection where you can go straight (to the instance entrance), go left or go right path. Both the left and right passages lead to a dead-end. You may find Mad Magglish in either the left or right passage (his camping area or the blind alley).
[18D] Trouble at the Docks, the NPC you are looking for, Mad Magglish, can be found in three different locations. He can be hard to find as he is invisible (when you get close to him he appears and attacks you). Upon entering the cavern you will come to the first intersection (T shaped) where you can go left toward the instance entrance or straight to a small drop off. The small nook to the right is the first location where Mad Magglish may be found. If you can't find him there, proceed down the left passage toward the instance entrance. You will come upon a second intersection where you can go straight (to the instance entrance), go left or go right path. Both the left and right passages lead to a dead-end. You may find Mad Magglish in either the left or right passage (his camping area or the blind alley).
When you enter the instance take the quests in the entrance and then continue to follow the path killing all in your way until you reach a large cavern area - Screaming Gully. Be warned - the raptors will call for help when almost dead. In this room is one of the four Fanglords, named "Lady Anacondra". Kill any mobs Lady Anacondra has with her, and then focus on her. Lady Anacondra often drops ![]() [Serpent's Shoulders] and is near the entrance, and is well worth farming just for that item.
[Serpent's Shoulders] and is near the entrance, and is well worth farming just for that item.
The Druids of the Fang deserve a special mention, they'll engage first with lightning bolts, and then shapeshift into Cobras to engage in melee. When heavily damaged, they'll morph back to heal themselves. Each Druid of the Fang is also capable of putting a party member to sleep. If you have a shaman, tell him/her to use a Tremor Totem whenever someone's asleep, and use ![]() [Wind Shear] to disrupt a druid's initial lightning bolt to force them to charge. Also save a
[Wind Shear] to disrupt a druid's initial lightning bolt to force them to charge. Also save a ![]() [Kick], shock, or
[Kick], shock, or ![]() [Counterspell] for their final heal. The same technique can be used to fight each of the Leaders of the Fang. Deviate Shamblers later can cast regeneration on themselves, purge utterly counters this.
[Counterspell] for their final heal. The same technique can be used to fight each of the Leaders of the Fang. Deviate Shamblers later can cast regeneration on themselves, purge utterly counters this.
After Lady Anacondra, you can either go to the east or west along the river. Jump down into the water and head west. Somewhere along this river, you'll meet a turtle called Kresh. He wanders around in the waters that run through the dungeon. Kresh is a non-aggressive turtle and no tougher than any of the normal elite mobs. He drops a really nice blue shield (![]() [Kresh's Back] or
[Kresh's Back] or ![]() [Worn Turtle Shell Shield]) or can be tamed by a hunter. Killing Kresh is not necessary to complete the instance, and you can ignore him. Climb the circuitous path up from Kresh's pool. Once you have traveled up the path you will find yourself in a big room filled with random monsters. Just follow the path and clear the monsters. Most of them are easy to kill, but be careful of additional monsters who wander around. After defeating the monsters you will find Lord Cobrahn, another one of the four Fanglords. Lord Cobrahn may drop
[Worn Turtle Shell Shield]) or can be tamed by a hunter. Killing Kresh is not necessary to complete the instance, and you can ignore him. Climb the circuitous path up from Kresh's pool. Once you have traveled up the path you will find yourself in a big room filled with random monsters. Just follow the path and clear the monsters. Most of them are easy to kill, but be careful of additional monsters who wander around. After defeating the monsters you will find Lord Cobrahn, another one of the four Fanglords. Lord Cobrahn may drop ![]() [Robe of the Moccasin]. In the same area you will find Lord Pythas, another one of the 4 Fanglords. Pythas is the toughest of the Leaders of the Fang. He puts out a lot of melee damage, and he has a lot of hitpoints.
[Robe of the Moccasin]. In the same area you will find Lord Pythas, another one of the 4 Fanglords. Pythas is the toughest of the Leaders of the Fang. He puts out a lot of melee damage, and he has a lot of hitpoints.
Jump off the cliff, you'll return to the main room and go east. The Deviate Faerie Dragon is a rare mob you may encounter in this area. Not difficult, drops nice caster gear, but appears rarely. Odds are good that you will never see him unless you enter the instance repeatedly to hunt for him. The next (optional) boss along the path is "Skum", a big old thunder lizard. Skum generally won't cause you any serious problems himself, but in addition to the two druids guarding his pen, there are usually a number of other druids, dreadfangs, and oozes nearby, which you may want to remove before killing Skum himself. Skum drops a semi-good dagger, ![]() [Tail Spike], or a high agility cape,
[Tail Spike], or a high agility cape, ![]() [Glowing Lizardscale Cloak] so if you have any rogues or hunters you may as well drop him. Eventually you will find a big room with "Verdan the Everliving" and "Lord Serpentis". Serpentis is a very standard melee fighter for the most part, with less hit points than Pythas. Kill any of the random mobs around Serpentis first, don't let him get past your tank(s), and don't get near and aggro Verdan the Everliving, and you should be fine. Verdan the Everliving on the other hand is a very different story. Killing Verdan is optional, he is not the object of any quest.
[Glowing Lizardscale Cloak] so if you have any rogues or hunters you may as well drop him. Eventually you will find a big room with "Verdan the Everliving" and "Lord Serpentis". Serpentis is a very standard melee fighter for the most part, with less hit points than Pythas. Kill any of the random mobs around Serpentis first, don't let him get past your tank(s), and don't get near and aggro Verdan the Everliving, and you should be fine. Verdan the Everliving on the other hand is a very different story. Killing Verdan is optional, he is not the object of any quest.

After you've killed all four Leaders of the Fang, go back to the entrance and speak with the tauren druid Muyoh to start the Naralex event. You'll have to escort the Muyoh through a path of mobs to wake up Naralex. Even if you cleared the path, there are two set points along his path at which mobs will spawn; dispatch them when they appear. None of these are particularly difficult. When you reach Naralex, Muyoh will begin to wake him. You must continue to protect the Disciple while he wakes Naralex. A few waves of mobs spawn, serpents, then slimes, that can be easily dispatched. You get enough time to eat and drink between waves of mobs, if everyone stays on the island and deals with the current wave quickly enough. The last spawn is the boss Mutanus the Devourer, a huge murloc. You won't have a long rest before him, Mutanus comes up rather quickly, but you should be able to get everyone's health and mana restored. Mutanus can be tough depending on who you have in your party.
Resources
Loot
Outside the instance
| Boss | Weapons and shields | Leather | Other | |
|---|---|---|---|---|
| Trigore the Lasher (Rare) | ||||
| Mad Magglish |
| |||
| Boahn (Rare) |
Inside the Instance
Related achievements
Wailing Critters
![]()
Starting with patch 7.2.0, the Wailing Caverns are also home to a special solo scenario for the Pet Battle System called Wailing Critters.
- It challenges players to complete eleven pet battles, including a final battle versus a Legendary foe.
- All enemies are Level 25 pets of increasing quality that are classified as either Elite or Boss.
- There are actually two different scenarios: a one-time scenario and a weekly challenge scenario.
- The one-time scenario requires level 110 and one level 25 pet, but it's recommended you have at least three max level pets. Pets can be healed and revived between battles.
- The weekly challenge scenario requires level 110 and at least fifteen level 25 pets. Pets cannot be healed or revived between battles.
- Among the rewards are several pets related to the instance, like the Son of Skum,
 [Cavern Moccasin],
  [Everliving Spore] or
  [Young Venomfang].
 - Once inside the scenario, you cannot leave or you'll have to start over. Most battles are against Beast type pets, so Mechanical pets will have a clear advantage.
- The enemies are "deviate" variants of small critters and the reptile pets of the named Druids of the Fang.
- Muyani gives access to the scenario, and player can teleport there by talking to Manapoof at the Magical Menagerie of Dalaran.
Notes
- The map for the Cavern of Mists is named Wailing Cavern.
- In prior patches, after Naralex is awakened by the Disciple (i.e., Mutanus is defeated), Naralexx would turn into an owl and fly away. Amusingly, the Disciple would not transform, but would float away as a standing tauren in the same spiraling flight path as his boss. This earned the Disciple the nickname "hovercow".
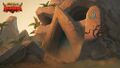
- When viewed from the front, the entrance to the Wailing Caverns looks vaguely like a snake skull. The right eye socket is a cave now empty, but was pre-Patch 4.0.3a the location of several NPCs and the only location to obtain leatherworking patterns using
 [Deviate Scale]: Nalpak (started
  [17D] Deviate Hides), Ebru, Kalldan Felmoon and Waldor <Leatherworking Trainer>
Gallery
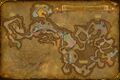
Map prior to patch 4.1.0.

Shrine of the Scarab, a RPG region.
Entrance on an image for the Forged in the Barrens Hearthstone expansion.


Patch changes
 Patch 10.1.5 (2023-07-11):
  [Stuffed Deviate Scale Pouch] added as a drop.
  Patch 7.3.5 (2018-01-16): Level scaling implemented, previous instance level: 15 - 25.
  Hotfix (2013-05-29): Fixed an issue where Muyoh could be killed, preventing players from completing the dungeon.
  Patch 4.1.0 (2011-04-26): Maze section removed. Lord Pythas and Skum moved elsewhere in the dungeon.
  Patch 1.5.0 (2005-06-07): New load screen added.
 - Patch 1.3.0 (2005-03-07): Capped at ten players.
 Patch 0.9 (2004-08-17):
- Deviate Crocolisks are now non-elite and no longer respawn.
- Deviate Thundersnouts were replaced with groups of new, non-elite mobs called Deviate Lashers.
- New creatures were added to the snake wing. They are called Deviate Pythons and are non-elite.
- Most of the dungeon is on a two-hour respawn now (with the exception of the roamers which respawn every 30 minutes)
- Skum is now a constant spawn instead of a rare. His hit points were increased.
References
- ^ Game Guide/World Dungeons#Wailing Caverns
- ^ Naralex quotes
- ^ World of Warcraft: Exploring Azeroth: Kalimdor, pg. 140
- ^ World of Warcraft: Chronicle Volume 1, pg. 122
- ^ [45] A Call from the Caverns
- ^ [45] Wailing Critters
- ^
 Azeroth Bleeds
- ^ Animal Research Project
- ^ Overgrown Animals
- ^
 Investigate Wailing Caverns
- ^ World of Warcraft: Exploring Azeroth: Kalimdor, pg. 141
External links

| |||||||||||||||||

| ||||||||