Countdown to Extinction (WC3 demo)
| Countdown to Extinction | |||||||||||
|---|---|---|---|---|---|---|---|---|---|---|---|
 | |||||||||||
| Location | Darkspear Islands | ||||||||||
| Result | Horde escapes with the Darkspear Tribe to Kalimdor | ||||||||||
| |||||||||||
| |||||||||||
| |||||||||||
| Previous | The Fires Down Below | ||||||||||
| Next | The Defense of Strahnbrad | ||||||||||
Countdown to Extinction is the final chapter of the Exodus of the Horde campaign.
During the battle, the Darkspear trolls and the Horde managed to escape the Sea Witch and her murlocs.
Transcript
Loading Screen
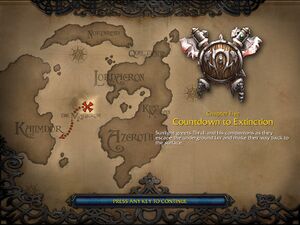
- Sunlight greets Thrall and his companions as they escape the underground lair and make their way back to the surface.
Quests
Main Quests
Hold the Line
- Objectives:
- Survive for 20 minutes
- Description
Optional Quests
Island Trolls
- Note: When the quest is completed, this quest is also called "Trolling for Trolls".
- Objectives:
- Rescue the Trolls for reinforcements.
- Description
- The Trolls who remain scattered across the island will surely perish unless you bring them to safety before time runs out.
Mission Fails
- All of your buildings have been destroyed.
Hints
New unit acquired
- Troll Witch Doctor - You may now build Troll Witch Doctors from the Spirit Lodge.
Quotes
Intro cinematic
 Sea Witch: "Land-dwellers! You have slaughtered my minions and defiled my sanctuary! Now, you will be drowned by the wrath of the tides!"
 Thrall: "You'll have no more sacrifices today, witch! Go back to the depths where you belong!"
 Sea Witch: "Very well, your choice is made! The air you breathe now will be your last!"
 Thrall: "At last! We've reached our landing site!"
 Raider: "Warchief! While you were gone, the nearby volcano erupted! This entire island has begun to sink!"
 Thrall: "How long to repair the ships?"
 Raider: "The repairs are nearly done, Warchief."
 Thrall: "Then finish them quickly! We're about to have company! Defend the ships at all costs!"
Optional quest discovered
 Troll Headhunter: "Hey, where the others go? They go with you?"
 Troll Headhunter: "We don't have much time!"
 Troll Headhunter: "You got a way off the island?"
 Troll Headhunter: "This island be sinkin' quick! We come with you, mon!"
Between the battle
 Sea Witch: "Your efforts are futile, land-dwellers! The darkness of the deeps is all that awaits you!"
 Sea Witch: "Soon this land will be consumed by the tides! Prepare for the sea's cold embrace!"
 Sea Witch: "Yes! At last, the end draws near! Your deaths are only the beginning! Soon all land-dwellers will be entombed in a watery grave!"
 Grunt: "We still need more time to finish the repairs, Warchief!"
 Grunt: "It won't be much longer now, Warchief. The ships are nearly ready!"
 Thrall: "Hold the line, my warriors! Our freedom is at hand!"
 Thrall: "Your witch cannot protect you now!" (when your forces attack the murloc's base - this is however not recommended to do as you'll be quickly overpowered)
Ending cinematic
 Sea Witch: "Sail on, land-dwellers. Flee! The Dark Tide is coming to swallow you all, and once it begins, there will be nowhere to hide!"
 Thrall: "I don't know exactly what the witch was talking about, but I do know that our destiny lies elsewhere. For now, we set sail for Kalimdor. That is where our future will unfold."
Unused quotes
 D05Thrall15: One of the shamans must have found a way to purify this fountain.
 D05Troll13: Hey, you got room for one more mon?
Units
Named
Creeps
The battle
As Thrall escapes, he is chased by the Sea Witch and her murloc warriors. The repairs to his storm-damaged ships are not done and he must rally his forces to hold the line and protect the ships until they are repaired. Unfortunately, the volcano on the island is also erupting and the whole island appears to to be sinking into the sea. Some imprisoned trolls around the island are rescued to provide reinforcements against the Sea Witch and her warriors.
After defending against different waves of attackers the ships are finally repaired and Thrall's forces continue on to Kalimdor, beginning the Invasion of Kalimdor.
Tips (normal difficulty)
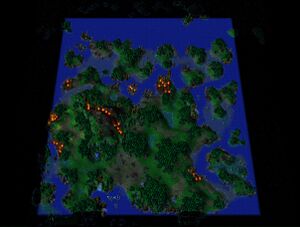
- As you'll quickly notice, your base will be attacked from three directions; west, east and north. It is possible to arrange and "focus" your units on these locations, as they will be attacked by different enemy forces.
- The western location will mostly be attacked by the Sea Witch herself, usually accompanied by three or four murlocs which often are healers. Thrall will often be able to fend them off by himself, if he uses his spirit wolves. As such, it is recommended to either begin the mission with or acquire during it spirit wolves at level 3.
- The northern location will often be attacked by Siege Golems, large and hard-to-kill golems intended for destroying your building. They are however not able to attack movable units other than with their "ground slam" ability. They also take additional damage from Piercing Attacks. As such, you can make a "wall" of troll headhunters between the trees on either side (make sure your nearby peons do not cut them down!) which will protect your guard towers. When a golem arrives, it will run back and forth, trying to reach the towers, occasionally slamming the ground until your headhunters kill it. To make sure your headhunters keep their position, set them on "hold position".
- The eastern location will often be attacked by large groups of weak murloc, rarely accompanied by a Siege Golem. Protect your towers with headhunters just as on the northern locations, and add orc grunts to absorb the murlocs' attacks (as headhunters are somewhat fragile).
- During the end of the mission, all three locations will suffer heavy attacks. Even murlocs sorcerers will join in. As such, it is advised to build up both defensive (mainly grunts) and offensive forces (headhunters and guard towers) on all, especially the northern and eastern.
- Your new units, the troll witch doctors, is your key to success. Their healing ward-spell is a must for sustaining your forces on the northern and eastern location. The western has a Fountain of Health which can be used instead, at least until the final minutes. Upgrade your witch doctors though the Spirit lodge as fast as possible to give them the spell! You'll also need to quickly upgrade your Great Hall into a Stronghold early, to access Witch Doctor Master Training.
- The optional quest is a good idea to complete, because of the extra trolls it will give you. You can find them a bit up the path leading from the western location, as well as just outside the northern.
- In order to quickly acquire some gold, have Thrall attack the nearby creeps outside the western location. He can easily manage them by himself by using his spirit wolves and chain lightning. Be sure to keep an eye on the western location in case it's attacked while Thrall is absent.
- There are several powerful items which Thrall could greatly contribute from in this mission. The wolves in the south-western corner drop a Potion of Greater Mana, the ones in the north-western drop a Talisman of Evasion, a Storm Wyrm in the middle of the map drops some Gloves of Haste. A Kul'Tiras Marine Tent is hidden behind some trees hold a Scroll of Restoration and a Crown of Kings +5, and a Goblin Merchant just outside the eastern locations sells nifty items such as Scroll of Healing (although expensive).
Forces
- 1
 Far Seer
 - 6+
 Peons
Peons - 2+
 Grunts
 - 7+
 Troll Headhunters
  Catapults (Classic) /
  Demolishers (Reforged)
- 1+

 Raiders
 - 3+
 Witch Doctors
  Shaman
 Spirit Wolves
- 1
 Sea Witch
 - 2
 Murloc Sorcerer / Mur'gul Shadowcaster
- 7+
 Murloc Tiderunners
  Murloc Huntsmans
 Murloc Seacultists
 Murloc Flesheaters
- Siege Golems
 Water Elementals
Notes
- This mission was cut out of the full game with just the tutorial levels left in Warcraft III: Reign of Chaos. The mission was first seen in the Warcraft III Demo which was made available after the release of the game. In Warcraft III: The Frozen Throne, Blizzard made a custom campaign which included the missions that were exclusive to the demo campaign; however, the voice acting was removed as the demo voice acting had only been recorded in English and Blizzard was unable to localize it for other regions.
- The scenario name is a reference to the album Countdown to Extinction by Megadeth.
- The Bone Chippers were replaced by Tidal Dwellers. All but one Altars of the Deep were removed, and the one left uses an Altar of the Depths model. The two Murloc Sorcerer heroes were replaced by Mur'gul Shadowcasters. The Sea Witch is now an actual naga sea witch.
Items
- Potion of Mana
- Scroll of Healing
- Claws of Attack +6
- Gloves of Haste
- Scroll of Restoration
 [Talisman of Evasion]
- Ring of Protection +4
- Healing Wards
- Mana Stone
- Crown of Kings +5
References
| |||||||


